Nail drills offer salon-perfect precision, but for beginners, they can be intimidating. One wrong move often leads to painful "friction burns" or thinned-out nails.
Safety First: Don't let the fear of "rings of fire" or thinned-out nails stop you. This guide is designed specifically for beginners. We will focus on the "Zero-Pressure" technique to ensure your natural nails stay 100% safe while you achieve salon-quality results.
This guide simplifies the process—teaching you the exact bits, speeds, and techniques to master your e-file safely and achieve stunning DIY results.
I. Getting Started: The Essential Setup
Investing in a quality nail drill is the first step. Before you begin, you must understand the machine's basic mechanics and the "Safety First" settings.
The Essential RPM & Bit Quick-Start Chart
One of the biggest challenges for beginners is knowing the right speed (RPM). Use this table as your go-to reference:
| Task / Step |
Recommended RPM |
Recommended Bit Type |
| Cuticle Work |
3,000 – 5,000 |
Flame Bit / Diamond Ball |
| Natural Nail Shaping |
5,000 – 10,000 |
Fine Sanding Band (240 grit) |
| Gel Polish Removal |
12,000 – 15,000 |
Ceramic or Carbide Bit |
| Buffing & Finishing |
3,000 – 5,000 |
Felt Buffer / Silicon Bit |
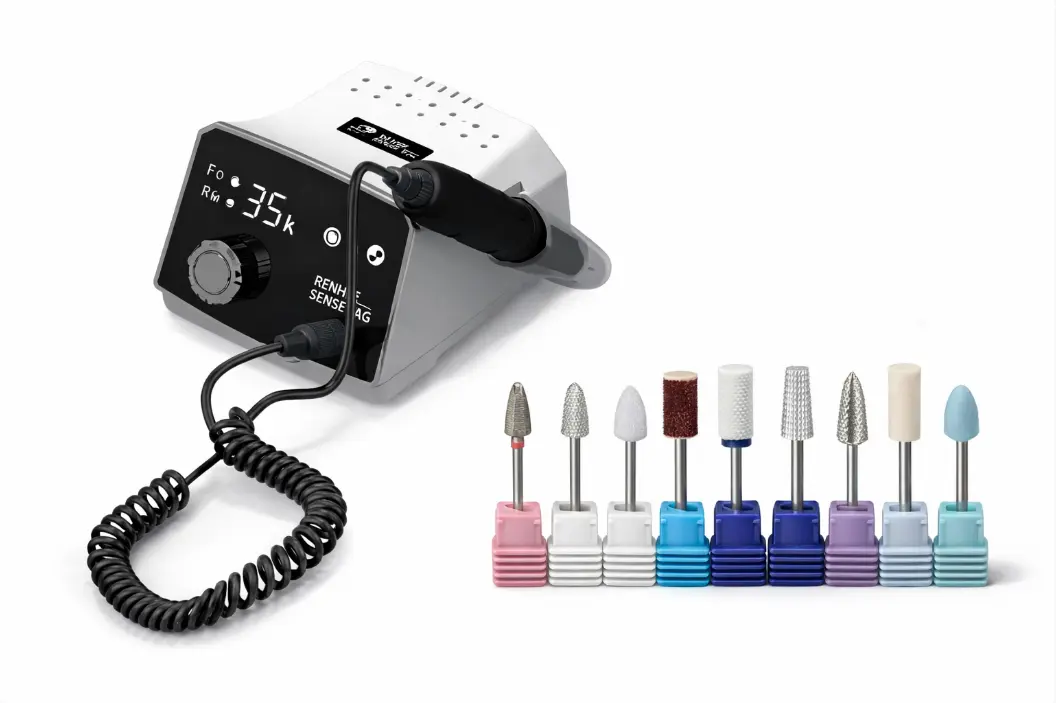
What Does F and R Mean on a Nail Drill? (Direction Guide)
Most drills have a Forward (F) and Reverse (R) switch. One of the most common beginner questions is about this direction switch. Choosing the correct direction prevents the drill bit from skipping or sliding out of control.
-
If you are Right-Handed: Hold the handpiece in your right hand and set the switch to F (Forward). Move the drill from the right side of the nail to the left.
-
If you are Left-Handed: Hold the handpiece in your left hand and set the switch to R (Reverse). Move the drill from the left side of the nail to the right.
-
The Rule of Thumb: The bit should always spin in the opposite direction of the way you are moving the drill across the nail. This provides the necessary friction to file correctly rather than having the bit "skate" dangerously across the surface.
Quick Nail Drill Bits Explained for Beginners
Using the wrong bit is a fast track to nail damage. Here is a simplified breakdown of what each basic bit does:
-
Mandrel Bit & Sanding Bands: Used for surface work, shortening natural nails, and removing gel top coats. (Remember: Sanding bands are single-use!).
-
Flame Bit (Diamond): The ultimate tool for gentle cuticle prep and cleaning dead skin around the nail folds.
-
Ceramic/Carbide Cylinder Bit: Heavy-duty bits designed strictly for removing hard gel, acrylics, or dip powder. Never use these on the natural nail plate.
II. How to Use a Nail Drill on Yourself: Step-by-Step
Ready to tackle your nails? Follow these steps for a professional DIY manicure:
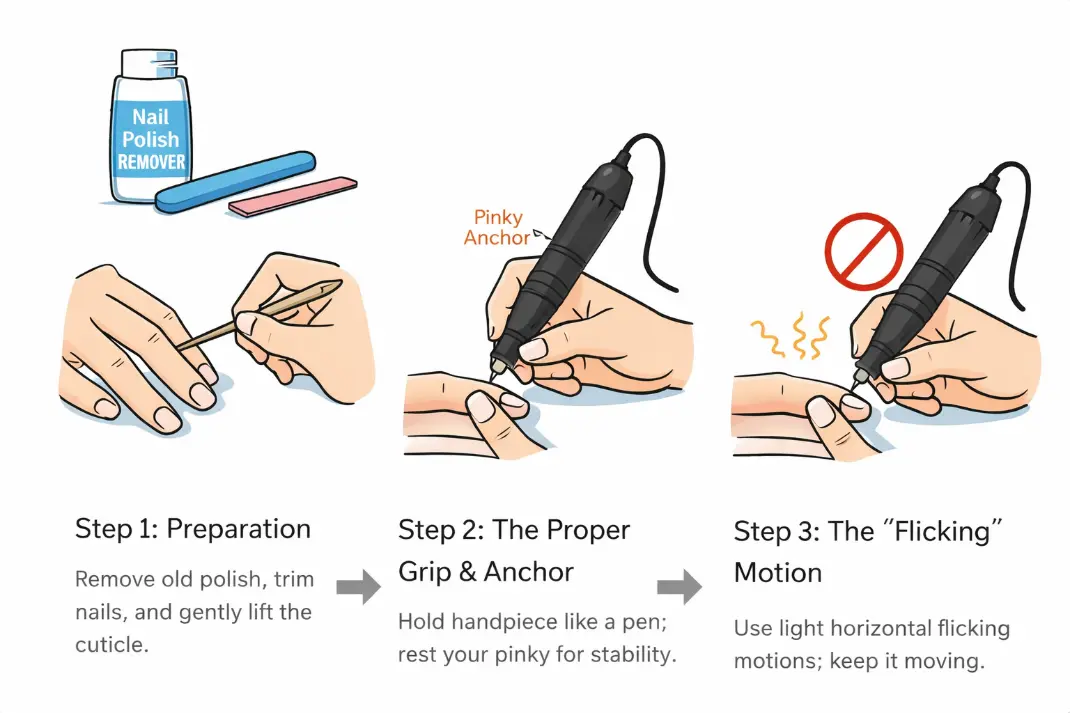
Step 1: Preparation
Remove old polish and trim nails to the desired length. Wash your hands with antibacterial soap and dry them thoroughly. Use a wooden cuticle pusher to gently lift the cuticle, creating a clean "pocket" for the drill bits to work safely.
Step 2: The Proper Grip & Anchor
Hold the handpiece like a large, heavy pen. To prevent slipping (which can cause injury):
The Pinky Anchor: Rest your pinky finger on your other hand or the table. This provides a stable pivot point for precise control.
Step 3: The "Flicking" Motion
Do not press down into the nail. Use light, horizontal "flicking" motions.
Keep it Moving: Never stay in one spot for more than a second. Friction creates heat quickly, which can lead to painful "rings of fire" (grooves in the nail plate).
III. Detailed Techniques for Different Nail Types
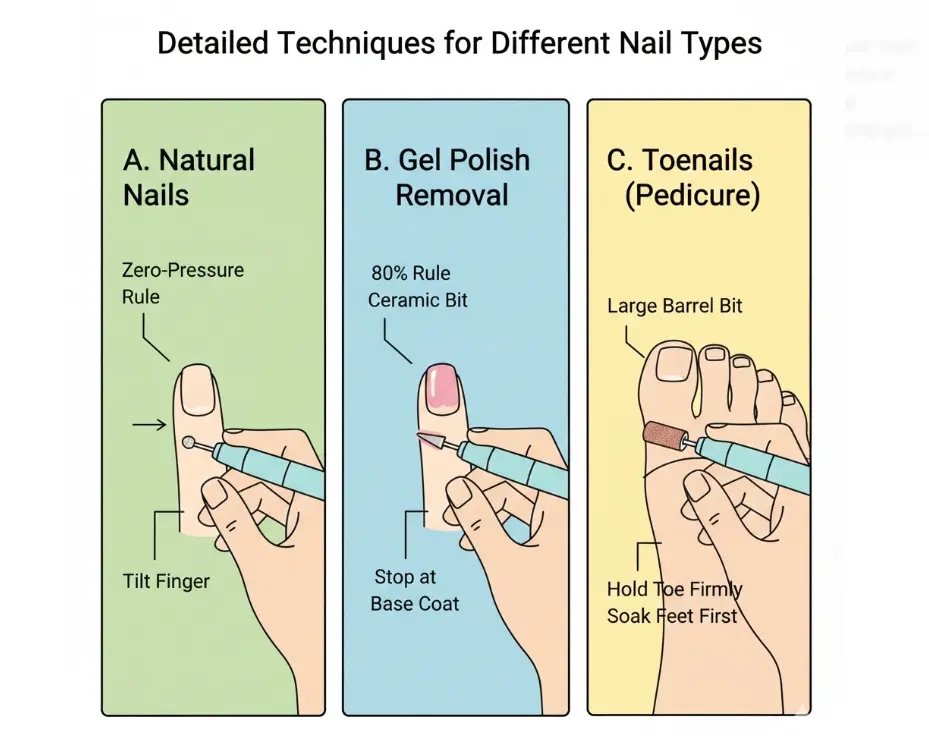
A. Working on Natural Nails (The "Zero-Pressure" Rule)
Natural nails are thin and sensitive. The goal here is gentle prep and shaping, not product removal.
- The Best Bits: Use Fine-grit Sanding Bands (240 grit) or Fine Diamond Bits. Never use coarse metal carbide bits on natural nails.
- The Technique: Move the drill in one consistent direction to prevent the nail layers from splitting. To shape the edges, tilt the finger instead of the drill for better control.
B. Removing Gel Polish & Dip Powder (The "80% Rule")
Gel requires more speed, but the key is knowing when to stop to protect your natural nail.
- The Best Bits: Ceramic Bits are preferred as they generate less heat. Use a Medium-grit Cylinder or Corn bit.
- The 80% Rule: Use the drill to remove only 80% of the gel color. Once the layer is thin and the base coat is visible, STOP. Soak the remaining 20% in acetone to ensure the high-speed bit never touches your natural nail plate.
C. Precision for Toenails (Pedicure Technique)
Toenails are typically thicker and require better ergonomics than fingernails.
- Stability: Since toes are further from your eyes, ensure you have a bright light source. Use your non-drilling hand to hold the toe firmly and pull the surrounding skin back.
- Bit Choice: Use a Large Barrel bit or a wider sanding band to cover the larger surface area of the big toe efficiently.
- Soften First: It is highly recommended to soak your feet in warm water for 5-10 minutes before drilling to soften the nail plate.
IV. Troubleshooting: Why Does My Nail Drill Burn?
If you feel a sharp "zing" of heat, it is usually caused by friction.
- Too much pressure: You are pushing the bit into the nail instead of letting the rotation do the work.
- Staying still: You are not moving the bit fast enough across the surface.
- Dull bits: Worn-out sanding bands require more pressure to work, creating more heat. Replace them after every use!
V. Cleaning and Maintenance
- Disinfecting Bits: Wipe away dust with a brush, then soak bits in 70% isopropyl alcohol for 10 minutes after each use.
- Proper Storage: Always unplug the drill and store the handpiece in its holder. The internal motor is delicate; dropping the handpiece is the most common cause of failure.
- Replacing Parts: Inspect bits for wear. Replace metal bits every 4-6 months and sanding bands after every use for hygiene and performance.
FAQs
1. Is a nail drill bad for your nails?
No. When used with the correct bit and "zero pressure," a drill is safe. Damage is almost always caused by improper technique or using the wrong RPM.
2. What speed should my nail drill be on for natural nails?
For natural nails, you should keep the speed very low, typically between 3,000 and 5,000 RPM. This is enough to gently buff or prep the nail without causing thinning or damage.
3. What is the first step of electric filing for pedicures?
Always start by soaking your feet in warm water for 5-10 minutes. This softens the thicker toenails and surrounding dead skin, making the drilling process smoother and safer.
4. Can I use a regular hand drill for my nails?
Absolutely not. Regular hardware drills lack the precise speed control, lightweight ergonomics, and specialized bits required for nail care. Using one can cause severe injury to your nail bed.
5. How often should I replace nail drill bits?
Sanding bands are single-use. Carbide and diamond bits should be replaced every 4–6 months if you notice they are losing their "bite" or taking longer to file.
6. Should I get a cordless or corded nail drill?
For beginners, cordless is highly recommended. It offers a better range of motion without a cord getting in the way while you are learning your grip and angles.
Conclusion
Mastering a nail drill is a journey of patience and practice. By starting with the right RPM, choosing the correct bits for natural or gel nails, and maintaining a steady "flicking" motion, you can achieve professional-grade results from the comfort of your home. Remember, the key to a perfect manicure isn't just speed—it’s the precision and safety that come with understanding your tools.
Ready to upgrade your nail game? To achieve the salon-quality precision we’ve discussed in this guide, you need a reliable tool that grows with your skills. Visit the RHJC Official Website to explore our range of professional-grade nail drills. Designed with beginners in mind, our drills offer the perfect balance of smooth power and ergonomic control, helping you create stunning nails with confidence and ease.